Please note that I barely pay attention to this site anymore and is only here for archive purposes. Any comments are likely to go ignored.
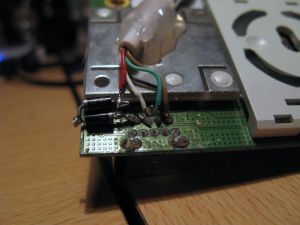
Update: I updated the post to mention using two 1N4001 or equivalent diodes instead of just one. Two diodes in series take the voltage down to almost exactly 3.3V, which is the required voltage for the RF board. I also added actual photos of the wiring now, as I’ve redone it (hence the messy wires from re-soldering Etc.)
Update 2: It seems that syncing is impossible directly from the RF module and PC, but if the wireless controller you use was already synced with the RF module, and hasn’t been re-synced with another Xbox since, it will work. However, I am working with another modification I found which adds LED and sync enable functions by means of a serial connection with a PIC16F628A μC. You can find the related forum post here: Link (and see how my thrown together version of it looks [here] and [here]. Messy, I know :P).
Update 4: Alternative means of syncing mentioned in the comments by George.
Update 5: Further testing on alternative syncing method shows how non-play & charge kit compatible peripherals can be synced -without- a microcontroller. Thanks, Pat.
—
Yesterday I had a thought – I don’t like having a wire to the Xbox360 controller I use for games on my PC. As I’m tight on cash right now I figured I’d have a quick look around to see if there was a way to use a wireless controller on the PC without going out and buying the official wireless transceiver. I was thinking that there may be some other RF transceiver that could be modified or adapted to work with it. As it happens, there -kind of- is.
Now if you’re like me, and have a spare wireless controller sitting around, it’s likely you have a dead red ringed Xbox 360 sitting in a cupboard. This is the key to getting the controller working with a PC. The wireless transceiver in the Xbox can be made to work with a little modification. Well, I say modification but I really mean little more than soldering a few wires and altering a .inf file. Let’s get on to it:
What you’ll need:
- Dead/Red Ringed Xbox 360 you don’t mind cannibalising.
- Any old USB cable you don’t mind cutting.
- Two diodes – a couple of 1N4001 or equivalents will do. Basically it’s just there for a forward voltage drop WHICH IS VITAL (unless you don’t mind burning the board out and killing your USB controller).
- A soldering iron.
- Solder.
- A brain.
Taking the Xbox 360 apart:
I’m not going to reinvent the wheel here. Anandtech.com has a perfectly good explanation of how to do this. Take a look here: http://www.anandtech.com/show/1864/inside-microsoft-s-xbox-360/3
Pro tip: Instead of a small plastic knife that they say to use to ping open the case, you can either buy a tool for it, make one out of an old CD/DVD spindle cover, or just rip the damn thing open with a screwdriver (after all, it’s dead right?).
The part you’re looking for:
It’s the board on the front of the machine where the ring and power button are. It’s held on by 3 screws, so be sure to pop the little plastic part off to find the third screw. Don’t go trying to pry it off like I almost did. Once the screws are out it just unplugs. And that’s your part.
The soldering part:
As you’re reading this and have an interest in it I’ll assume you know how to cut, strip, and tin your wires, so I’ll not bother with that part. Instead I’ll assume you’re sitting there with an RF board, a USB cable ready for soldering, a diode, and a hot soldering iron. Basically, follow the picture (click for bigger image):
Beginner’s mistake/brain fart moment warning: Make sure the diode is the right way around.
I chose to cut the diode legs down a fair bit and soldered it off to the left of pin 1, along the bottom edge of the RF module. You might like that idea, you might not. It’s up to you how you solder it. I could have been neater, but I honestly didn’t see much point. I’m not going to make a project box for it or anything, and it’ll be hidden away somewhere so practicality > looks.
I will mention again that the diodes are ABSOLUTELY NECESSARY. The whole board runs on 3.3V while USB standard is 5V. The diodes that you put in series on the power line will lower the voltage to tolerable levels for the board – almost exactly 3.3V, to be honest (my multimeter is showing 3.34V). From what I’ve read in comments in various places the RF board likes to burn out quite spectacularly without a diode in place, taking the USB controller it’s connected to with it. I was paranoid enough about it to actually test the unit on my old Macbook (that I neither care about nor use) before trusting it on my main machines.
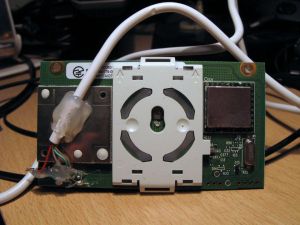
Once you have that all soldered up, you have yourself a wireless dongle for your Xbox 360 wireless controller, something like this:
Congratulations. Now for the software.
The software part:
This bit isn’t all that scary. You just need to modify the .inf file that comes with the official Microsoft drivers to allow for the different PID of the RF controller of the Xbox 360. First, if you don’t have it already, download the Xbox 360 Accessories Software for your operating system from the Microsoft gaming software download site, and install it. Now, before plugging the RF module in, you need to do that modifying I mentioned. Head over to c:Program FilesMicrosoft Xbox 360 Accessories (or wherever you installed it to) and make a backup of Xusb21.inf before opening it in your favourite text editor (Notepad++ is nice for it’s ini support with collapsing headers etc).
The parts you’re going to modify are under the headers [MSFT.NTx86.6.0], [MSFT.NTamd64.6.0], [MSFT.NTx86], and [MSFT.NTamd64].
What they’ll look like/similar to:
%XUSB21.DeviceName.Wired%=CC_Install, USBVid_045E&Pid_028E
%XUSB21.DeviceName%=CC_Install, USBVid_045E&Pid_0719
%XUSB21.DeviceName.Wired%=CC_Install, USBMS_COMP_XUSB10
%XUSB21.DeviceName%=CC_Install, USBMS_COMP_XUSB20
%XUSB21.DeviceName.Jump%=CC_Install, USBVid_045E&Pid_028F
What you need to change them to:
%XUSB21.DeviceName.Wired%=CC_Install, USBVid_045E&Pid_0291
%XUSB21.DeviceName%=CC_Install, USBVid_045E&Pid_0291
%XUSB21.DeviceName.Wired%=CC_Install, USBUNKNOWN
%XUSB21.DeviceName%=CC_Install, USBUNKNOWN
After you’ve saved the changes, go ahead and plug in the RF module. Chances are it will complain that drivers can’t be found. Cancel out of the hardware wizard and head over to the device manager and find the Unknown USB Device, or whatever it is your flavour of Windows has decided to call it. You’ll know which one it is by the yellow !triangle! (and if you don’t have a clue what I’m on about, what are you doing trying to hack an Xbox component on to a PC in the first place?). Give the device a right click and update it’s drivers, but tell it you have a disk and navigate to the Xusb21.inf you modified. It might complain about unsigned drivers, it might not, but if it does just tell it to continue. At the end of it all you’ll have an Xbox 360 Controller for Windows device with a Hardware Id of USBVID_045E&PID_0291 in your Device Manager. If not, reboot.
After all that, try syncing your Wireless controller with the unit. With any luck you should have a controller showing in your gaming devices. Give it a quick test with the diagnostics, maybe calibrate it etc.
And you’re done. On to wireless gaming. (o/
Any questions feel free to ask in the comments below and I’ll see what I can do to help.


